There are two main methods for deploying a Hexo site:
Local Deployment: This traditional method involves generating site files locally by executing Hexo commands, and deploying the website to a server using rsync or git through the appropriate Hexo deployer plugin. This approach requires you to manually handle the deployment process each time you update your site.
Continuous Integration (CI): This is a more efficient and automated deployment method. You simply upload your blog's source code to a git repository, and the site is generated and published through an automated process. This method leverages services like GitHub Actions, GitLab CI/CD, or other CI tools to automate the deployment, making updates and management easier and more consistent.
Local Deployment
- Modify files locally.
- Localization testing:
hexo clean && hexo s. - Deployment:
hexo g -d.
Continuous Integration
- Edit the file directly online, effective immediately
- Automatic deployment, simultaneous deployment to multiple locations
Cloudflare Pages
Cloudflare Pages is a JAMstack platform for frontend developers to collaborate and deploy websites. You can connect your GitHub or GitLab account with Cloudflare Pages. After that, you just need to push your blog source code to the repository, and create a new project in Cloudflare Pages. In the project's settings, you can configure the build settings as shown below.
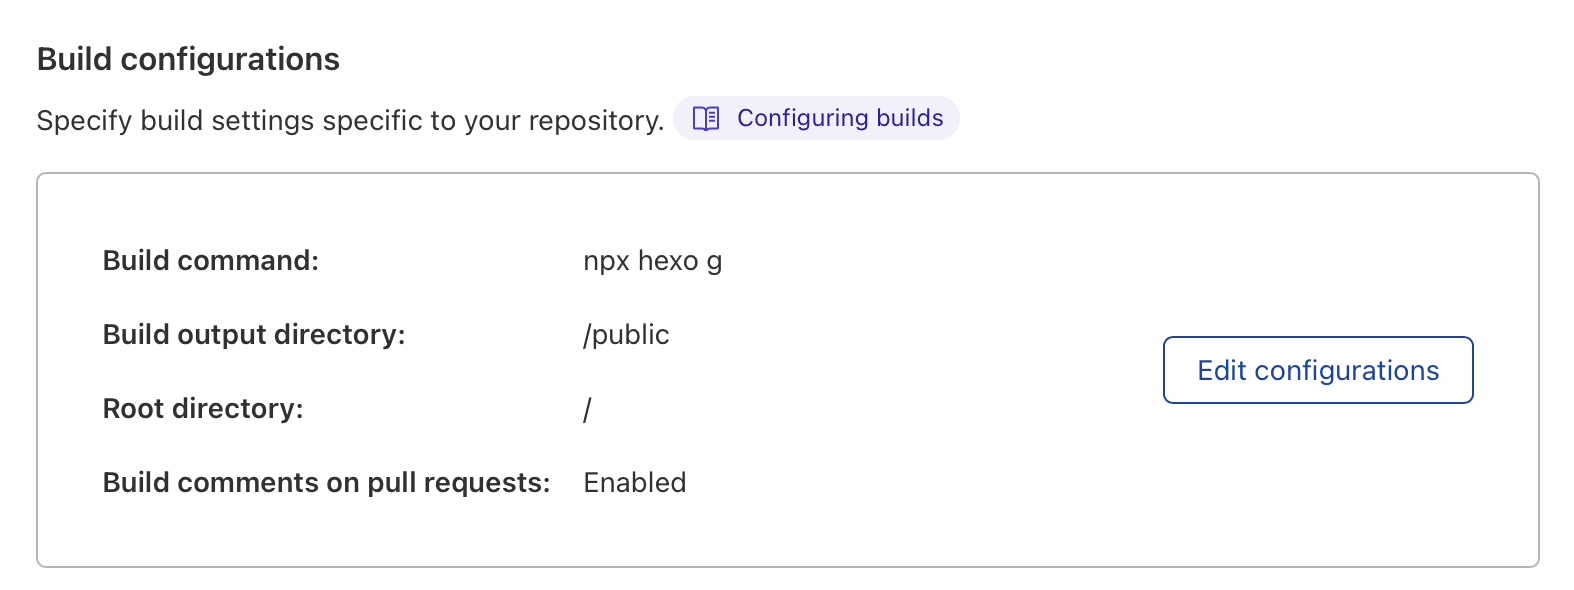
Cloudflare Pages will automatically build and deploy your site.
Netlify
Netlify is an all-in-one platform for automating modern web projects. Replace your hosting infrastructure, continuous integration, and deployment pipeline with a single workflow. Integrate dynamic functionality like serverless functions, user authentication, and form handling as your projects grow.
Perhaps you have already found that this website is deployed on Netlify. Checkout deploy.sh and netlify.toml in theme-next-docs repository for more information.
Github Pages
To publish your Hexo site on Github Pages, you need create a GitHub repository and push your local repository to it. Visit your GitHub repository, from the main menu choose Settings > Pages. In then center of your screen you will see this option:
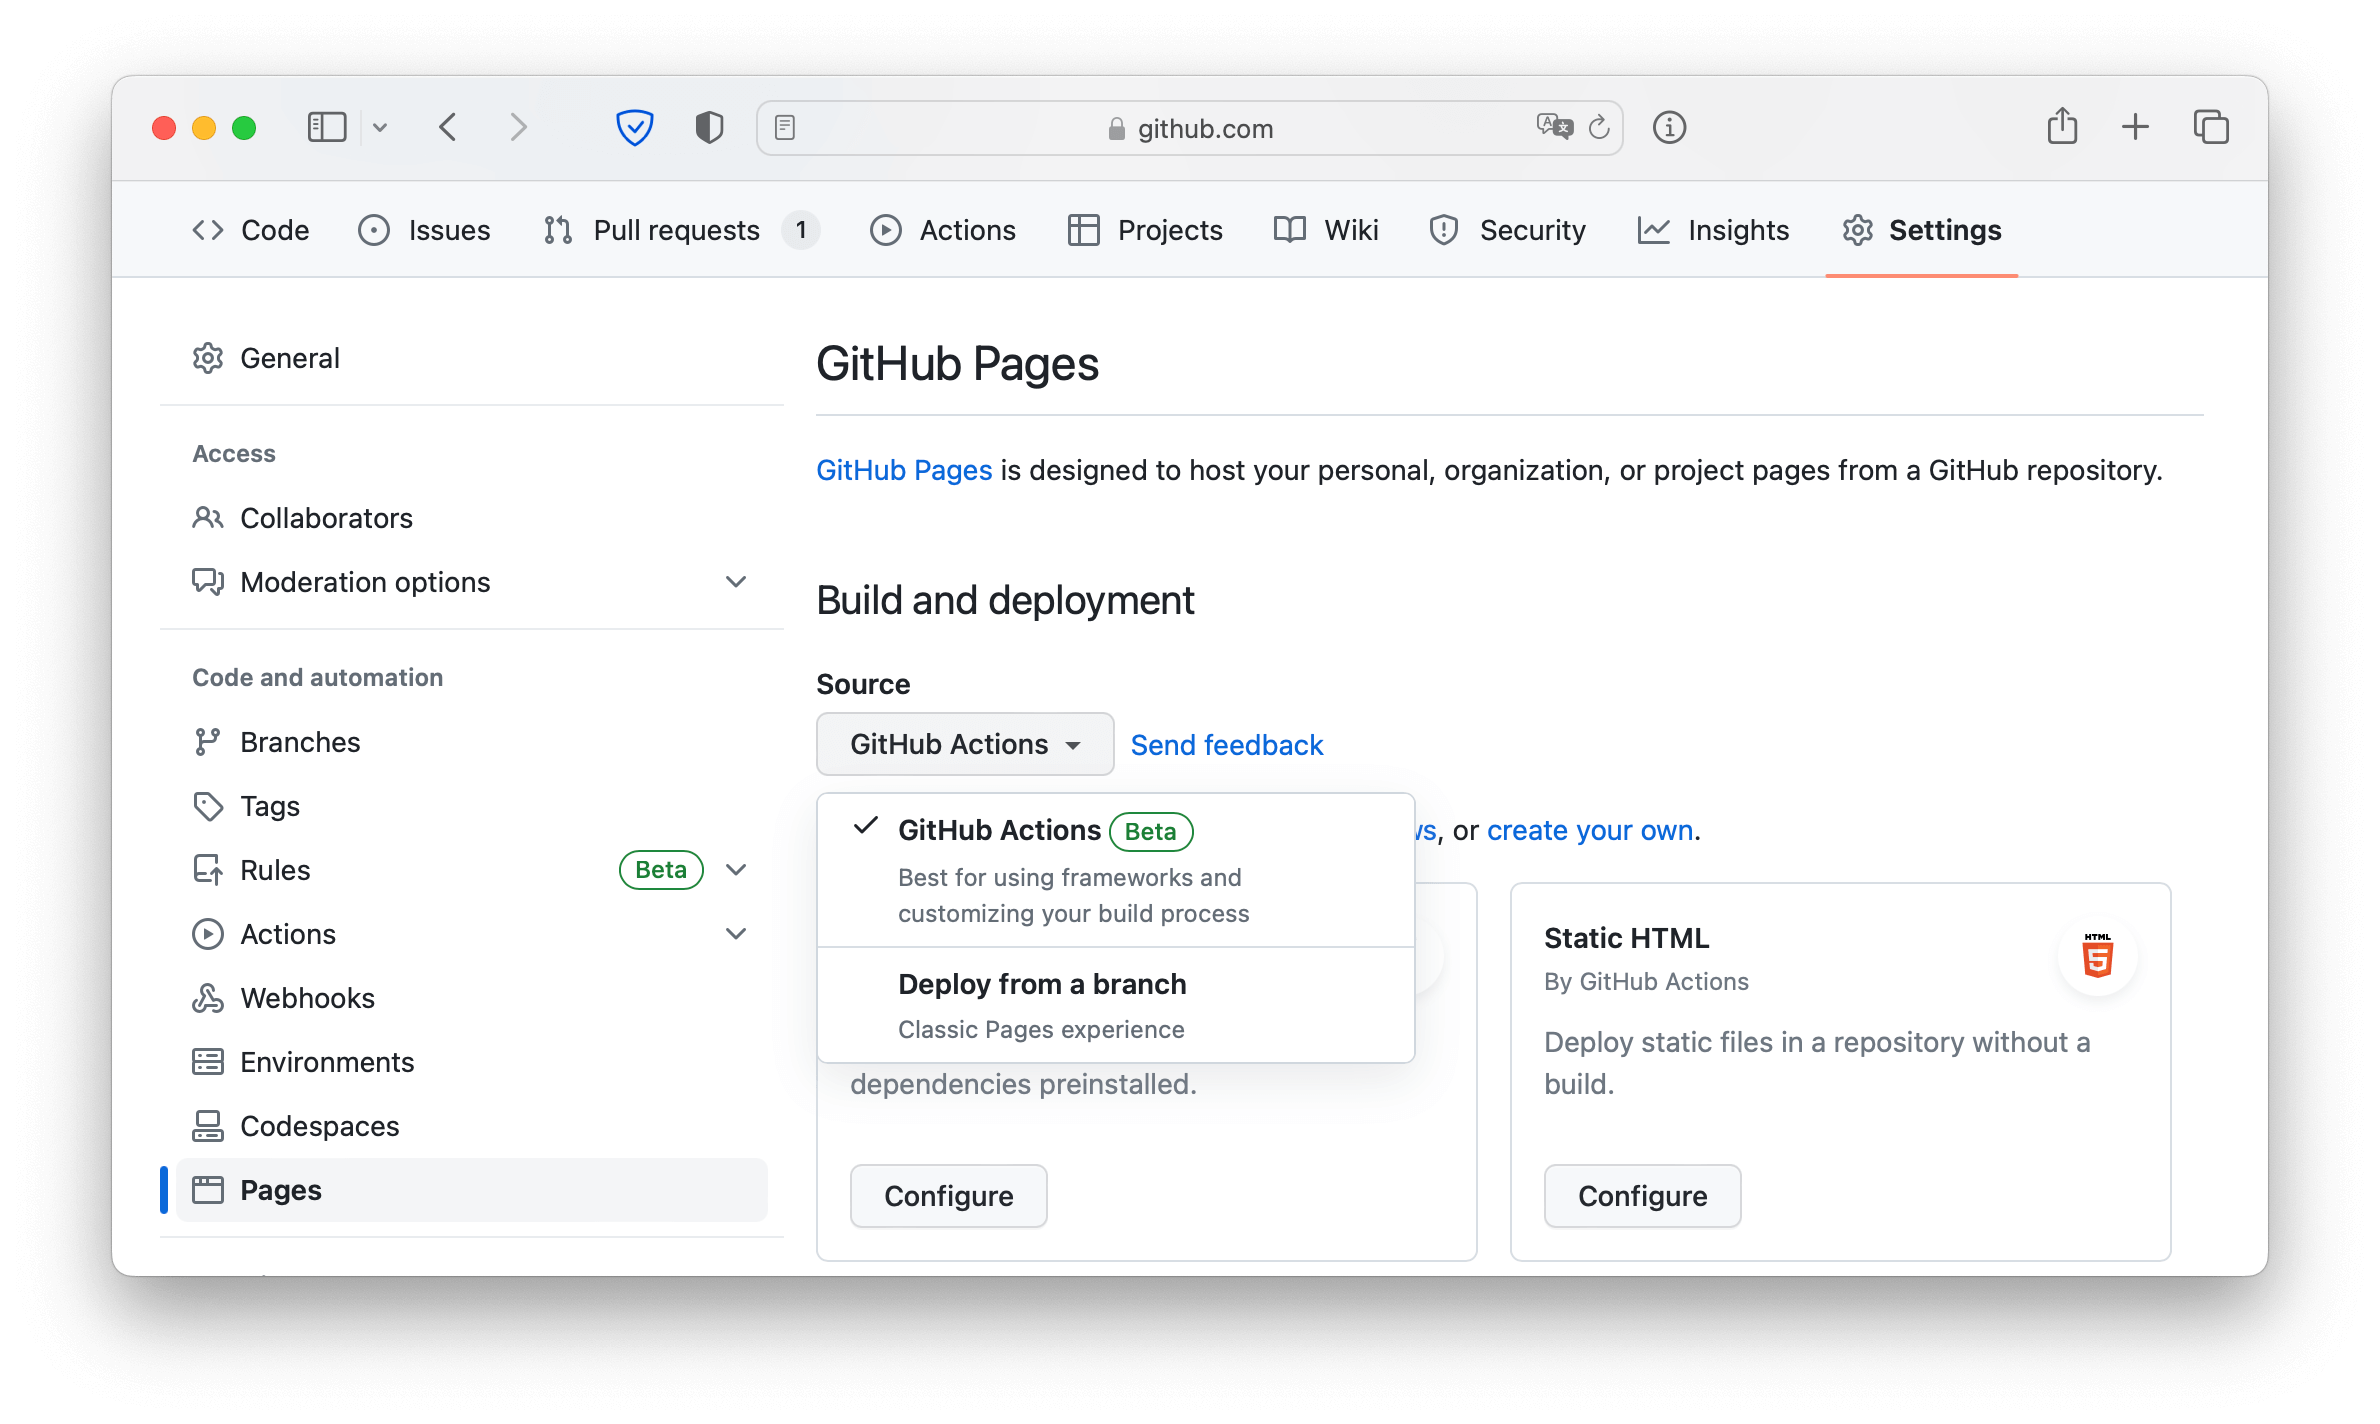
Change the Source to GitHub Actions. The change is immediate; you do not have to press a Save button.
Create an empty file .github/workflows/hexo.yaml in your local repository. Copy and paste the YAML below into the file you created. Change the branch name and other parameters as needed.
# Sample workflow for building and deploying a Hexo site to GitHub Pages |
Commit the change to your local repository with a commit message of something like "Add workflow", and push to GitHub. GitHub will build and deploy your site automatically. In the future, whenever you push a change from your local repository, GitHub will rebuild your site and deploy the changes.
Gitlab CI
GitLab offers a continuous integration service and pages service. If you add a .gitlab-ci.yml file to the root directory of your repository, and configure your GitLab project to use a Runner, then each commit or push, triggers your CI pipeline. The .gitlab-ci.yml file tells the GitLab runner what to do. By default it runs a pipeline with three stages: build, test, and deploy. You don't need to use all three stages; stages with no jobs are simply ignored. And at the end, your websites will be published on GitLab Host automatically.
Add
.gitlab-ci.ymlto the root directory of your repository, and configure it.hexo/.gitlab-ci.yml image: node:lts
before_script:
# Set TimeZone, eg: Asia/Shanghai
# - export TZ='Asia/Shanghai'
# Restore last modified time
- "git ls-files -z | while read -d '' path; do touch -d \"$(git log -1 --format=\"@%ct\" \"$path\")\" \"$path\"; done"
pages:
stage: build
cache:
paths:
- node_modules/
script:
- npm install
- npx hexo deploy
artifacts:
paths:
- public
only:
- masterUpload
scaffolds,source,themes,.gitignore,.gitlab-ci.yml,_config.yml, andpackage.jsonto your Gitlab repository.$ git init
$ ssh -T git@gitlab.com
$ git remote add origin YOUR-GITLAB-REPO-SSH-LINK
$ git add .
$ git commit -m "COMMIT MESSAGE"
$ git push -u origin master
Now, your static website is available at https://yourname.gitlab.io/project that is similar to GitHub. More GitLab Pages config in here.
Of course, you can also publish static website on GitHub Pages or others pages service. There are two ways to configure .gitlab-ci.yml:
Get the Access Token:
Settings→Developer settings→Personal access token→Generate new token. Set access rights according to the actual situation. It should be noted that the access token is only displayed once on this page, and it should be copied, otherwise it can only be regenerated.Click
SETTINGS-CI/CD → Variablesin Gitlab, and defined access token as custom variableGITHUB_ACCESS_TOKEN. Or setUSERNAMEPASSWORDvariable for coding repo.Configure
.gitlab-ci.yml: only add deploy stage at the end of this filehexo/.gitlab-ci.yml github:
stage: deploy
script:
- cd ./public
- git init
- git config --global user.name "YOUR-USER-NAME"
- git config --global user.email "YOUR-EMAIL"
- git add .
- git commit -m "gitlab-auto-deploy"
- git push --force --quiet --set-upstream https://$GITHUB_ACCESS_TOKEN@github.com/username/username.github.io.git master # replace github_access_token
# - git config http.postBuffer 524288000
# - git push --force --quiet --set-upstream https://$USERNAME:$PASSWORD@git.coding.net/username/reponame.git master # replace username & password, please escape the password
only:
- master
Deploy key is a SSH key set in your repo to grant client read-only (as well as r/w, if you want) access to your repo. This method is suitable for most public blog repositories and there are no private sub-modules in the repositories.
Generate a deploy key
$ ssh-keygen -t rsa -b 4096 -C "{email}" -f ~/.ssh/deploy_key
Click
SETTINGS-CI/CD → Variablesin Gitlab, copy the content of private key and defined it as custom variableDEPLOY_PRIVATE_KEY.Configure
.gitlab-ci.yml: only update script inbefore_scripthexo/.gitlab-ci.yml before_script:
# Set TimeZone, eg: Asia/Shanghai
# - export TZ='Asia/Shanghai'
- git config --global user.name "YOUR-USER-NAME"
- git config --global user.email "YOUR-EMAIL"
# Restore last modified time
- "git ls-files -z | while read -d '' path; do touch -d \"$(git log -1 --format=\"@%ct\" \"$path\")\" \"$path\"; done"
# Install ssh-agent if not already installed, it is required by Docker.
# (change apt-get to yum if you use a CentOS-based image)
- 'which ssh-agent || ( apt-get update -y && apt-get install openssh-client -y )'
# Run ssh-agent (inside the build environment)
- eval $(ssh-agent -s)
# Add the SSH key stored in SSH_PRIVATE_KEY variable to the agent store
- ssh-add <(echo "$DEPLOY_PRIVATE_KEY")
# For Docker builds disable host key checking. Be aware that by adding that
# you are susceptible to man-in-the-middle attacks.
# WARNING: Use this only with the Docker executor, if you use it with shell
# you will overwrite your user's SSH config.
- mkdir -p ~/.ssh
- '[[ -f /.dockerenv ]] && echo -e "Host *\n\tStrictHostKeyChecking no\n\n" > ~/.ssh/config'
# In order to properly check the server's host key, assuming you created the
# SSH_SERVER_HOSTKEYS variable previously, uncomment the following two lines
# instead.
# - mkdir -p ~/.ssh
# - '[[ -f /.dockerenv ]] && echo "$SSH_SERVER_HOSTKEYS" > ~/.ssh/known_hosts'
# Install pandoc, eg: v1.19.2.1
# - wget https://github.com/jgm/pandoc/releases/download/1.19.2.1/pandoc-1.19.2.1-1-amd64.deb
# - dpkg -i ./pandoc-1.19.2.1-1-amd64.deb
image: node:lts
pages:
cache:
paths:
- node_modules/
script:
- npm install
- npx hexo deploy
artifacts:
paths:
- public
only:
- master
Variables are not masked, and their values can be shown in the job logs if explicitly asked to do so. So make sure gitlab pipelines can only be viewed by yourself.